Wednesday, 4 April 2012

Final Piece

Final Finished Photo Booth


awkward giant me.... I really hope people understand that i'm making a mockery of myself (and that woman that always features on the photo booths!)


if i had more time, definitely would have worked more on the coin slot bit... 


This is one of my favourite bits of the whole thing. simple extras that help the whole photo booth feel


Tuesday, 3 April 2012

More graphics!

So again on photoshop, i've re-created the insert money graphics by re-drawing it all with lines, shapes, text and fill tool. The button and the insert money gadgets are obviously fake because they're flat. But this I hope will look like the work of that artist I looked at previously (Matt Nicholson) where his camera buttons were all 2D, and looked obviously flat, as though he was emphasising the fact that it was all made of cardboard. 


This is the photo booth I am trying to imitate. It has graphics on the outside to intrigue and inform the customers what it's all about.


This is my first (rough) design for the outside bit. I am literally copying it, and changing the pictures to my own images of awkward smiling, and the words so there is more emphasis on the smiling aspect rather than the passport aspect.
Halfway through creating this I realised that realistically, I have one day to get this all done, I can't print any bigger than A3 in college, and I don't have time to send it to printers...etc. So this design will only fill one rectangle of A3.... and on my booth it's going to look rubbish with just a random print stuck on. I'm going to have to cut out the images I use, and the text, and then stick it onto the cardboard structure.


The grey background is where the cardboard will be. Everything else will be cut out and stuck on individually. 
I chose to re-take that picture of myself so it becomes even more cheesy. I'm imitating that woman in the red shirt (with the most fake smile in the world...she's probably not even real!)
I hope when people see this work, they're going to understand that I'm making a mockery of myself... i'm emphasising that awkward smile i'm displaying on my face. Its not that i'm trying to show off and i'm smiling nicely... because i'm definitely not. That is a very awkward and unnatural smile right there!!

Really hope this works and looks good on my photo booth tomorrow!

Day 3 studio


fake buttons
big gap where the flaps can be opened to insert the laptop

hole for the "photos"

Still need to stick this bit on. BUT there has been a huge change of plan.
I went to central loan store today and it turns out I cannot use laptops for the exhibition.... so my idea of a skype conversation isn't going to work. The way i'm going to work around it is by replacing the laptop with a mirror. If the graphics and the whole photo booth on its own is good enough, the viewers will still leave with this message "don't worry about what you look like in photographs as much. enjoy what comes more naturally."
It is a shame that I can't do this "embarrass my audience" bit. If I had my own equipment and technology, then it could have worked. But unfortunately due to circumstances, I am going to have to settle with just a mirror and no live recording and humiliating. Tomorrow, I am going to have to do a really job with the aesthetics of the photo booth. Curtain, outside graphics bit, and general tidying up.

Practicing the art of "smiling"


This is a video of my friend following the instructions inside the photo booth.

....this is how you should smile

Monday, 2 April 2012

Day 2 of Making


Did A LOT of work in the studio today. The whole structure is pretty much done now, with a few tweaks yet, so grateful to my tutors that helped me with the building bit... as if I thought I could just hang the cardboard without a wooden structure!

Tomorrow I will finish making the booth. 
Need to still cover up the sides so you can't see the laptop and wooden structure. 
Need to make a curtain/ buy a curtain, and attach that somehow.
And definitely need to do something about that chair...
Then I can work on the graphics and appearance of the whole thing...


Sunday, 1 April 2012

The Graphics

Did all the graphics for the inside of my photo booth today. Took a while, all on photoshop... but they are looking goooooood!


Saturday, 31 March 2012

Day 1 of Making

Bought 10 A1 pieces of grey board today… hopefully this should be enough to make the whole thing!

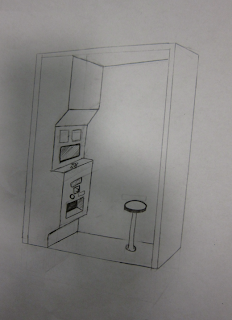
Here are my “to scale” plans:


face view from inside the booth (if you were sitting on the chair)


view from outside the booth

side view

end of day 1


This is where I had trouble with my measurements. I didn’t make the top long enough. It was 15 cm, now its 40… hopefully this will work now. But this is the annoying thing about not being able to actually putting these pieces together. Unfortunately I can’t put it all together until im in the studio, otherwise I wont be able to transport it to college… also I can’t hammer nails, or hooks or shelves into these walls. Fingers crossed I can get this all done in time.
Monday morning, assemble the whole thing. Then that will leave tues and wed to finish it off, practice on people… and do evaluation. LOTS OF WORK!

Tomorrow- plan is to get the graphics done (instructions, and anything else that will go on it, and maybe make a start on evaluation and paperwork)